
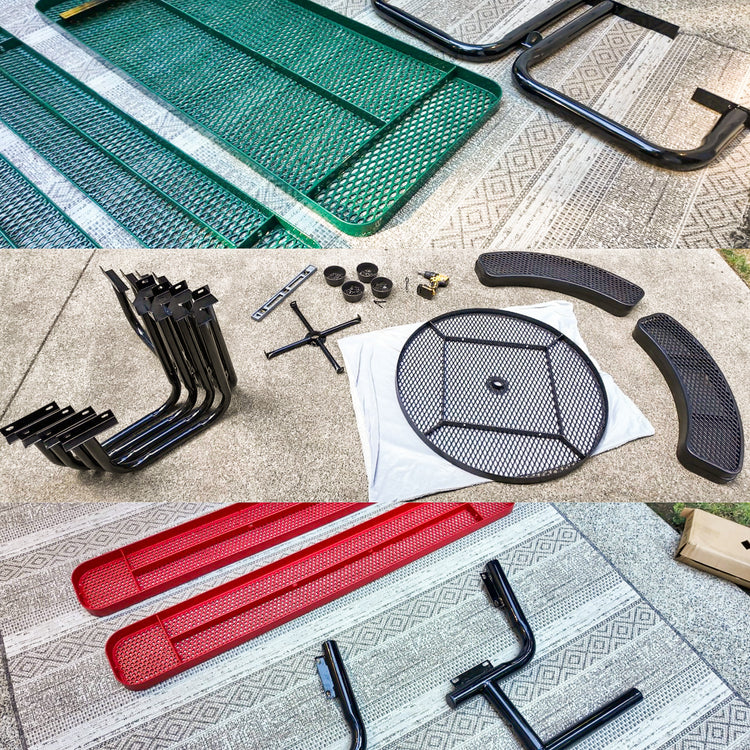
Instructions
PRODUCT SETUP INSTRUCTIONS
Square Table
6FT Rectangle Table
Inground Bench With Back
Inground Bench Without Back
Surface Mount Bench With Back
Surface Mount Bench Without Back
Portable Bench With Back
Portable Bench Without Back
Round 3-Seat Table
Square ADA-Compliant Table
Rectangle ADA-Compliant Table
Garden Bench
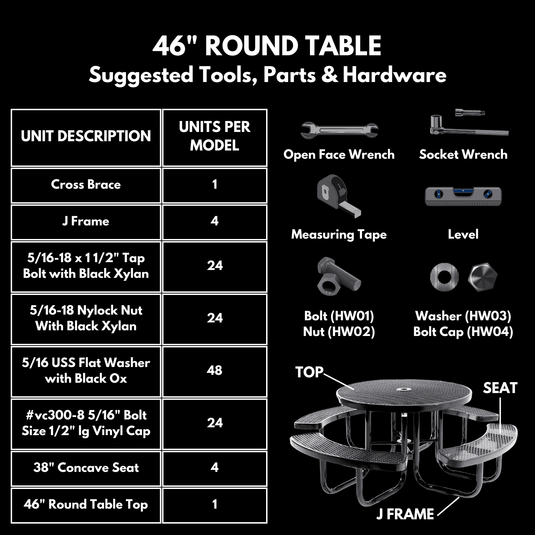

46" ROUND TABLE
Step #1 — Lay table top down (table bracing facing up) on a flat, smooth surface. Cover ground under table top during the set up process to prevent damage.
Step #2 — Attach frames to table top using provided hardware (1-bolt, 1-nut & 2-washers per hole). Table brace should sit inside angle iron on frame. Hand tighten hardware.
Step #3 — Attach seats to frames using hardware provided (1-bolt, 1-nut & 2-washers per hole). Hand tighten hardware.
Step #4 — Attach cross braces to each tab on the center of the frame (1-bolt, 1-nut & 2-washers per hole). Hand tighten hardware.
Step #5 — Flip table right side up.
Step #6 — Level tops and seats and use socket and open face wrench to fully tighten hardware. Place bolt end caps on bolt ends.
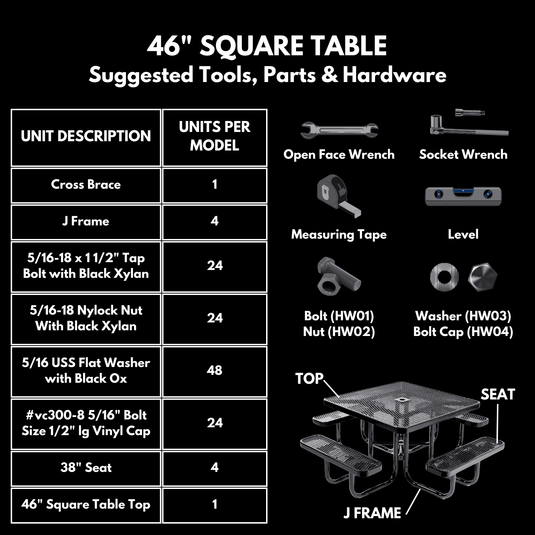

46" SQUARE TABLE
Step #1 — Lay table top down (table bracing facing up) on a flat, smooth surface. Cover ground under table top during the set up process to prevent damage.
Step #2 — Attach frames to table top using provided hardware (1-bolt, 1-nut & 2-washers per hole). Table brace should sit inside angle iron on frame. Hand tighten hardware.
Step #3 — Attach seats to frames using hardware provided (1-bolt, 1-nut & 2-washers per hole). Hand tighten hardware.
Step #4 — Attach cross braces to each tab on the center of the frame (1-bolt, 1-nut & 2-washers per hole). Hand tighten hardware.
Step #5 — Flip table right side up.
Step #6 — Level tops and seats and use socket and open face wrench to fully tighten hardware. Place bolt end caps on bolt ends.


6FT RECTANGLE TABLE
Step #1 — Lay table top down (table bracing facing up) on a flat, smooth surface. Cover ground under table top during the set up process to prevent damage.
Step #2 — Attach frames to table top using provided hardware (1-bolt, 1-nut & 2-washers per hole). Table brace should sit inside angle iron on frame. Hand tighten hardware.
Step #3 — Attach diagonal braces from diagonal brace tab in center of frame to center table top brace using hardware provided (1-bolt, 1-nut & 2-washers per hole). Hand tighten hardware.
Step #4 — Flip top & frame assembly upright and attach seats to frame using hardware provided (1-bolt, 1-nut & 2-washers per hole). Hand tighten hardware.
Step #5 — Level tops and seats and use socket and open face wrench to fully tighten hardware. Place bolt end caps on bolt ends.
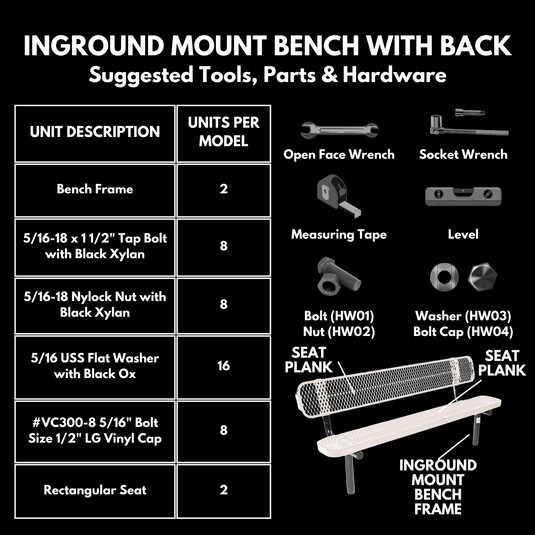

INGROUND MOUNT BENCH WITH BACK
Step #1 — Attach seat plank for bottom seat to portable bench frame using hardware provided (hand tighten at this time).
Step #2 — Attach seat plank for back seat to portable bench frame using hardware provided (hand tighten at this time).
Step #3 — Level seat and back and use socket and open face wrench to fully tighten hardware. Place bolt end caps on bolt ends.
Step #4 — Mount bench into ground approximately 18" leaving the top of the seat to be 18" ground.


INGROUND BENCH WITHOUT BACK
Step #1 — Attach seat plank for bottom seat to portable bench frame using hardware provided (hand tighten at this time).
Step #2 — Level seat and use socket and open face wrench to fully tighten hardware. Place bolt end caps on bolt ends.
Step #3 — Mount bench into ground approximately 18" leaving the top of the seat to be 18" ground.
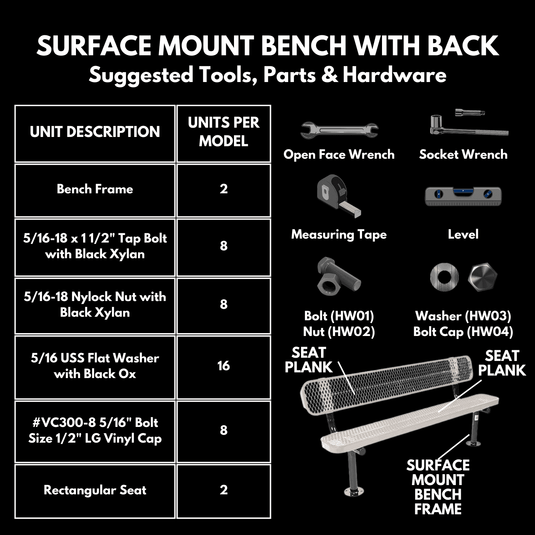

SURFACE MOUNT BENCH WITH BACK
Step #1 — Attach seat plank for bottom seat to portable bench frame using hardware provided (hand tighten at this time).
Step #2 — Attach seat plank for back seat to portable bench frame using hardware provided (hand tighten at this time).
Step #3 — Level seat and back and use socket and open face wrench to fully tighten hardware. Place bolt end caps on bolt ends.
Step #4 — Mount bench onto concrete ground using concrete 3/8" x 3" concrete anchor bolts (not included).
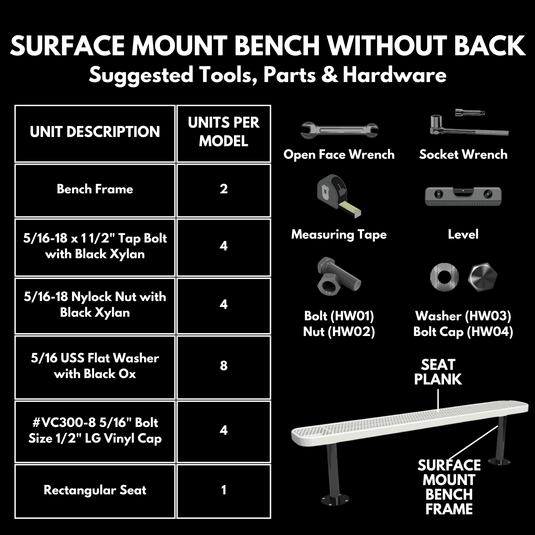

SURFACE MOUNT BENCH WITHOUT BACK
Step #1 — Attach seat plank for bottom seat to portable bench frame using hardware provided (hand tighten at this time).
Step #2 — Level seat and use socket and open face wrench to fully tighten hardware. Place bolt end caps on bolt ends.
Step #3 — Mount bench onto concrete using concrete anchor bolts. (3" x 5/8" redhead concrete anchor bolts recommended). Anchor bolts are not included.
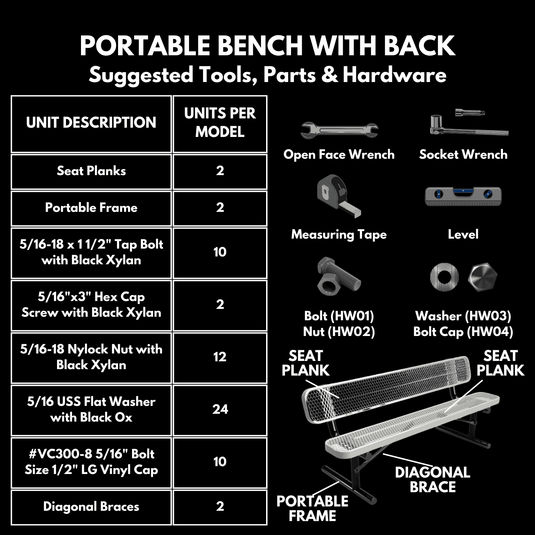

PORTABLE BENCH WITH BACK
Step #1 — Attach seat plank for bottom seat to portable bench frame using hardware provided (hand tighten at this time).
Step #2 — Attach seat plank for back seat to portable bench frame using hardware provided (hand tighten at this time).
Step #3 — Attach diagonal brace to portable bench frames from hole in center of leg post to bracket under seat plank (use 3" bolts for legs).
Step #4 — Level seat and back and use socket and open face wrench to fully tighten hardware. Place bolt end caps on bolt ends.
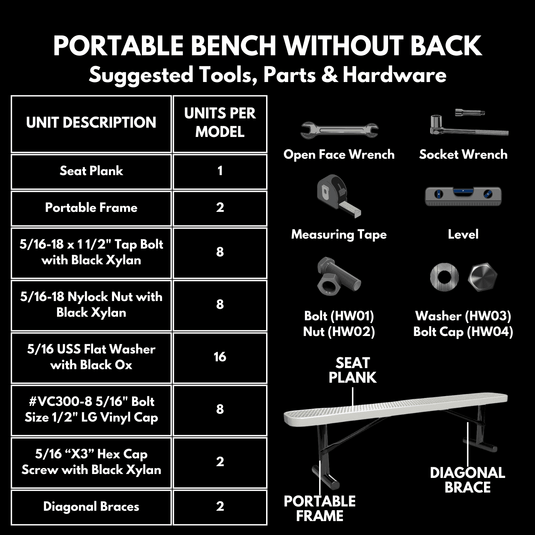

PORTABLE BENCH WITHOUT BACK
Step #1 — Attach seat plank for bottom seat to portable bench frame using hardware.
Step #2 — Attach diagonal brace to portable bench frames from bracket under Seat Plank (use 3" bolts for legs).
Step #3 — Level seat and use socket and open face wrench to fully tighten hardware. Place bolt end caps on bolt ends.
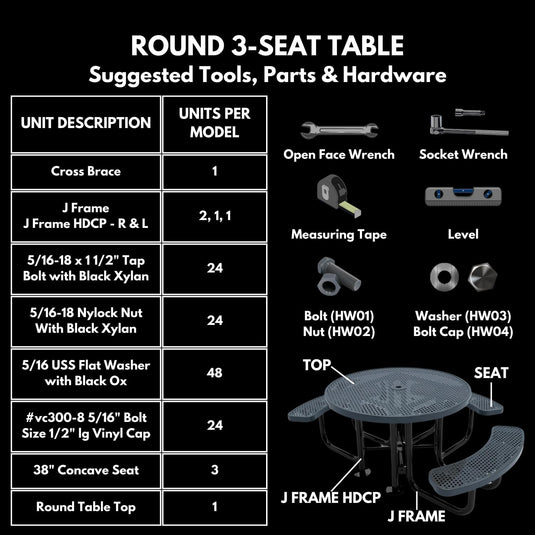

ROUND 3-SEAT TABLE
Step #1 — Lay table top down (table bracing facing up) on a flat, smooth surface. Cover ground under table top during the set up process to prevent damage.
Step #2 — Attach frames to table top using provided hardware (1-bolt, 1-nut & 2-washers per hole). Table brace should sit inside angle iron on frame. Hand tighten hardware. Make sure left HDCP goes on left side & right HDCP goes on right side.
Step #3 — Attach seats to frames using hardware provided (1-bolt, 1-nut & 2-washers per hole). Hand tighten hardware.
Step #4 — Attach cross braces to each tab on the center of the frame (1-bolt, 1-nut & 2-washers per hole). Hand tighten hardware.
Step #5 — Flip table right side up.
Step #6 — Level tops and seats and use socket and open face wrench to fully tighten hardware. Place bolt end caps on bolt ends.
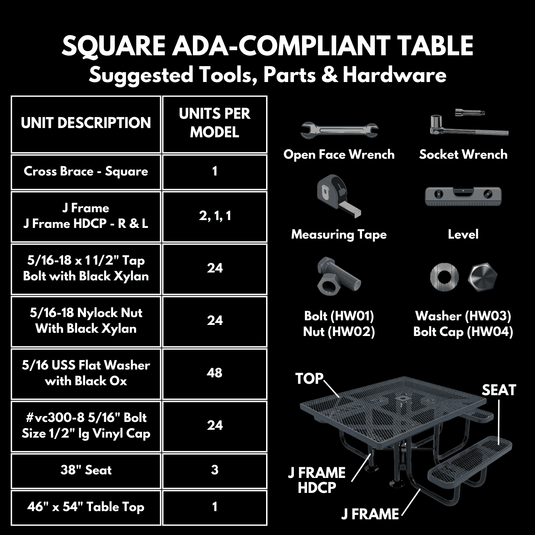

SQUARE ADA-COMPLIANT TABLE
Step #1 — Lay table top down (table bracing facing up) on a flat, smooth surface. Cover ground under table top during the set up process to prevent damage.
Step #2 — Attach frames to table top using provided hardware (1-bolt, 1-nut & 2-washers per hole). Table brace should sit inside angle iron on frame. Hand tighten hardware. Make sure left HDCP goes on left side & right HDCP goes on right side.
Step #3 — Attach seats to frames using hardware provided (1-bolt, 1-nut & 2-washers per hole). Hand tighten hardware.
Step #4 — Attach cross braces to each tab on the center of the frame (1-bolt, 1-nut & 2-washers per hole). Hand tighten hardware.
Step #5 — Flip table right side up.
Step #6 — Level tops and seats and use socket and open face wrench to fully tighten hardware. Place bolt end caps on bolt ends.


RECTANGLE ADA-COMPLIANT TABLE
Step #1 — Lay table top down (table bracing facing up) on a flat, smooth surface. Cover ground under table top during the set up process to prevent damage.
Step #2 — Attach frames to table top using provided hardware (1-bolt, 1-nut & 2-washers per hole). Table brace should sit inside angle iron on frame. Hand tighten hardware.
Step #3 — Attach diagonal braces from diagonal brace tab in center of frame to center table top brace using hardware provided (1-bolt, 1-nut & 2-washers per hole). Hand tighten hardware.
Step #4 — Flip top & frame assembly upright and attach seats to frame using hardware provided (1-bolt, 1-nut & 2-washers per hole). Hand tighten hardware.
Step #5 — Level tops and seats and use socket and open face wrench to fully tighten hardware. Place bolt end caps on bolt ends.


GARDEN BENCH
Step #1 — Attach portable legs to seat using hardware provided (hand tighten at this time).
Step #2 — Level seat and use socket and open face wrench to fully tighten hardware. Place bolt and caps on bolt ends.


